Primer on the Flex 3 Component Lifecycle
Abstract:†The Flex component lifecycle is a Flex framework mechanism for optimizing and coordinating the processes that create, update, and destroy Flex components.† This primer provides an overview of the lifecycle and describes how you can leverage it to create more advanced and efficient components.
Scope: †This is written for Flex 3, not Flex 4. †The Flex 4 lifecycle is briefly covered in the Conclusion section.
Audience: †This primer assumes youíre familiar with OOP basics. It also assumes you know how to employ these principles in Flex.† So, not only should you understand class hierarchies and inheritance in a general sense, you should also know how to create a Flex class that extends a framework class, how to override a parent method to modify/add behavior, etc.
Flex Component Lifecycle - Overview
The Flex component lifecycle is a Flex framework mechanism for managing and optimizing the processes that control all components. These processes perform tasks required by components (e.g., the creation of a composite componentís children) in a consistent sequence (e.g., children are created before attempting to modify their properties).†
 |
The term components is used here for the visual classes that you add to the display list and which comprise your UI.† You can also create non-visual classes ñ for example, data structures to serve as value objects ñ†but these donít participate in the component lifecycle and arenít covered here. |
The processes of the lifecycle are surfaced to you, the Flex developer, as protected methods.† When creating your components you can override these lifecycle methods to perform tasks such as sizing and positioning child components.† Understanding how the component lifecycle works can help you to perform these tasks more efficiently and thus allow you to create more efficient components.
Lifecycle methods are implemented in the UIComponent class. †UIComponent is also the base class for all Flex components.† As a result, all Flex components inherit the lifecycle methods and participate in the component lifecycle (but Flash-based components like MovieClip donít inherit from UIComponent and as a result donít participate in the lifecycle).
The Flex component lifecycle is divided into three primary phases.
- Initialization (birth phase)
- Update (life phase)
- Destruction† (death phase)
These primary phases are further divided into steps, or subprocesses. † Weíll look at these in a moment, but to get a feel for what the lifecycle does letís start by considering just one task your component will require, the rendering of property changes to the screen.
Like many things in Flex, render operations are performed asynchronously ñ when your component instructs Flex to change itís border from blue to yellow the operations that render that border color arenít executed immediately. †Thatís one of the optimization features of the Flash player and the component lifecycle† ñ †render requests are deferred so they can be applied efficiently.
How can deferral increase efficiency?† Consider the case where your code changes your componentís border to yellow to indicate a warning condition but then encounters an error and sets the border to red to indicate an error condition.† If property rendering was performed immediately and the componentís border was initially blue youíd see the border flashing from blue to yellow to red. †More importantly, the rendering processing would execute twice when once was all you needed ñ †you really only need that final value (red) displayed.† In this case itís more efficient to defer screen updates until you have your final property value (final for this frameís execution).† The final property value ìwinsî, only that value is rendered.†
The above may seem a trivial inefficiency, but consider scaling it up over many complex components undergoing many visual property changes which trigger many redundant render operations.† Do this and youíll soon start seeing unpleasant side effects.††
Keep in mind that rendering can be very expensive when a property change results in Flex having to adjust the layout and redraw many (or potentially all) objects currently on the display tree.† A property assignment that can execute in a millisecond can take much longer to render to the screen.† For example, it takes only an instant to increase a child componentís font size with a setStyle call but this small change can result in significant render processing.
So, efficient handling of property changes that require rendering to the screen is important.† Optimizing how your properties are processed and ultimately rendered is one benefit of the Flex component lifecycle. As weíll see, there are many others.
Before we talk more about the component lifecycle we need a small digression to consider how frames are handled in the Flash Playerís ActionScript virtual machine, or AVM.
The Flash player and frame processing
Your Flex app runs in the Flash player, which provides the virtual machine within which your ActionScript code executes (note that AS3 uses the Flash playerís second-generation virtual machine, AVM2).† The Flash player uses single-threaded execution, processing code sequentially, and it does its processing in cycles, breaking work up into units of work called frames.† The frame processing frequency is controlled by the SWFís frame rate.† By default Flex will execute (or attempt to execute) 24 frames per second (FPS).
At its most basic, each frame consists of a code execution phase followed by a render phase as illustrated below.
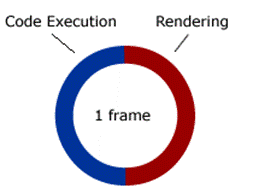
Figure 1:† Basic frame composition
The frameís code execution phase is where:
- your own ActionScript code executes. Examples of this include performing mathematical calculations, an event handler running in response to a user click event, populating an ArrayCollection in response to a HTTPService ResultEvent.† ††
- Flex framework code executes.† Examples are framework event dispatching (e.g., creationComplete), the processing of bindings, and lifecycle processes such as invalidation/validation methods (weíll cover these later).
The frameís rendering phase is where properties are translated to pixels. † If your component is cached as a bitmap then rendering can be cheap in terms of processing, but when it needs to be redrawn from its properties things can get expensive.† Especially when the display tree is deep.†
Some examples of rendering:
- resizing a component on the screen in response to a browser resize
- removing a component from the screen when youíve set its visible property to false
- updating the bars of a bar chart when its dataProvider changes
Understanding the cyclical nature of frame processing and the Flash playerís (and therefore Flexís) linear, asynchronous processing model can help you optimize your components.† Alternatively, improperly integrating your component into the lifecycle can result in screen flicker, draggable windows that move jerkily, and generally suboptimal performance and memory utilization.
Weíll look at the Flash player and frame processing again a bit later, but now letís return to the component lifecycle and its processes.†
LifeCycle Phases
The lifecycle is divided into three primary phases as shown in the table below.† Note that the term lifecycle is appropriate and descriptive here ñ weíre talking about the creation of your component (its birth) and its ongoing participation in your application (its life) and its ultimate removal from your application (its death).
| Lifecycle Phase | What the phase does for your component |
|---|---|
| Initialization (Birth) | memory is allocated to your component, its properties are assigned values, itís added to the display list, if it has children they are created and layed out, etc. |
| Update (Life) | your component does whatever itís supposed to do ñ displays data, responds to events such as mouse clicks, fires events that trigger data collection updates, etc. |
| Destruction (Death) | your component has outlived its usefulness †ñ itís destroyed and its memory becomes eligible for garbage collection |
Table 1: Component lifecycle phases
Not surprisingly, the Initialization phase is the most complex of the 3 phases.† Letís drill into it and see how your component is created, configured, and ultimately rendered to the screen.
Lifecycle Phase 1 - Initialization
The Initialization phase consists of many processes that create your component and eventually cause it to appear on the stage. Most of these processes are triggered by and dependant upon the completion of a predecessor process. Itís the Flex component lifecycle that ensures all of these processes execute in the proper order and with a consistent set of triggers.
Consider what needs to happen when your component is created:
- on the creation call (e.g., new myComponent();) Flex first has to perform low-level setup tasks like memory allocation
- once the class instance exists in memory it can be assigned property values, things like color=ì#FFFFFFî, visible=false, etc.†† These properties can come from several places, including Flex default property values, property values specified in MXML tags or assigned in ActionScript code, and of course Flex takes into account attributes set through CSS
- only after general properties are known can your component be measured (though this step isnít required if youíve provided explicit sizes).† For example, you canít determine a text fieldís height and width until you know its font size.
- once height and width are known Flex can determine dependant information such as the size of your componentís parent container (required if the parent doesnít have †a fixed size, e.g. a VBox with no height/width specified) and where the component belongs on the screen (its x/y coordinates)
- only after all of the above have been completed, at the end of the initialization phase, can Flex render your component to the screen
The Initialization phase breakdown is:
- 1. Initialization
- 1.1 construction (create it)
- 1.2 configuration (set its property values)
- 1.3 attachment (add it to the display list)
- 1.4 initialization (lots done here, e.g., processing of child components)
- 2. Update
- 3. Destruction
†The rest of this section (and the majority of this article) will focus on Initialization processes.†
1.1 Construction
The first step in component creation is execution of its constructor.† Your constructor could be triggered through:
∑ execution of ActionScript (e.g., new myComponent(); )
- OR -∑ an MXML instantiation (e.g., <myComps:myComponent/> )
In general your componentís constructor should do minimal work.† Itís ok to define event handlers here and you can set default values for properties inherited from the parent class.† However, in general your constructor should not create children or assign property values on child components ñ for these tasks youíll use the lifecycle methods createChildren and commitProperties (we'll cover these in a moment).
Note that construction is one place where MXML and AS components differ:
- MXML components do not contain a constructor (donít try to create a constructor in a <mx:Script> block of your MXML component, youíll get a compile error)
- If you want to use the component in MXML then your constructor must have no required arguments, since MXML provides no way to pass values to a component constructor
| |
Reminder:†This doesnít cover details on some topics like constructors.† However, resources listed at the end of this article provide in-depth information on all topics covered in this article. |
1.2 Configuration
Configuration is where the Flex framework processes your componentís property values.† This includes default property values, property values set in the constructor, and property values set by the user of your component (but not style properties, including inherited CSS, these are processed only after your component has been added to the display list).†
Examples of setting component properties:
mycompInstance.msgText = ìsome textî ;
<myComps:MyComponent id=ìmycompInstanceî msgText=ìsome textî/>
Your component will often create new properties that you can expose through either public variables or through a setter method.† So, either:
public var msgText:String ;
public function set msgText(value:String):void
{
your setter code hereÖ
}
Both of the above will work, allowing the user of your component to set the string ìsome textî on your componentís property msgText.† However, it's strongly recommended that you use setters rather than public variables.†
One reason for using setters is that setters let you run code each time a value is assigned to the property.† This is especially important when your component is a composite component ñ i.e., it contains other components, or children.† Why?† Because at component configuration time your child components donít yet exist (theyíre created later, in the createChildren method).†
To handle property assignments on child components the convention is to use a setter to store the property value in a private variable and then ñ after youíre sure your child component has been created ñ youíll assign this stored value to the childís property.† Weíll cover this later when we consider the lifecycle method commitProperties.† For now, just note that the processing of your componentís property values occurs immediately after construction.
Of course, another reason for using a setter rather than a public variable is that itís just good OOP ñ objects external to your component shouldnít be allowed to directly access your componentís internal data (the principle of encapsulation).
1.3 Attachment
The next step in the Initialization phase is adding your component to the display list.† When you instantiate your component through MXML this attachment occurs automatically.†† When you instantiate the component through ActionScript you'll programmatically add it to the display list using an addChild() or addChildAt() call.† So, something like:
    myComponentInstance = new MyComponent() ;
    someContainer.addChild(myComponentInstance) ;
Itís worth noting that the bulk of your component's initialization processing occurs only after the component has been added to the display list; if you donít add your component to the display list the component lifecycle processing will stall.
Components arenít immediately visible upon a call to addChild().† Rather, attachment makes your component able to participate in the remainder of the component lifecycle, particularly the invalidation/validation processing where critical tasks like measuring and layout are performed.†
Itís in the Attachment step, after your component has been added to the display list, that CSS style properties are processed. †Style values can be set earlier, even in the constructor, but they arenít actually processed (including walking the styles tree to determine inherited styles) and applied to your component until itís on the stage.
Now that our component has been created and added to the display list the initialization step of the lifecycleís Initialization phase can kick off.
1.4 Initialization†
The initialization step of the lifecycle's Initialization phase is where the bulk of your component creation work occurs.† Itís also the first time your component participates in the lifecycleís invalidation/validation processing, which is used throughout the component lifecycle (i.e., not just during your componentís ìbirthî, but also during its ìlifeî)
A summary of the Initialization subprocesses and their execution order is below:
- 1. Initialization
- 1.1 construction
- 1.2 configuration
- 1.3 attachment
- 1.4 initialization
- 1.4.1 dispatch preInitialization event
- 1.4.2 createChildren() is called
- 1.4.3 dispatch initialization event
- 1.4.4 first full invalidation/validation pass
- 1.4.5 dispatch creationComplete event
- 2. Update
- 3. Destruction
While steps 1.4.2 and 1.4.4 are the focus of the remainder of this section, itís worth taking a moment to consider the environment that exists when the events listed above fire.
- when the preInitialization event fires your componentís children havenít yet been created.† So, if your component creates subcomponents (children) you should be careful when overriding preInitialization ñ here, donít include code that references children you'll be creating in createChildren else youíll get a null reference RTE.
- upon dispatch of the initialization event your componentís children exist, but (as weíll see in a moment) your component is not quite ready for prime time ñ some properties have not yet been determined, most notably its size and width (unless an explicit size and width were assigned) and its x/y coordinates.
- By the time the creationComplete event fires your component has been configured, measured and layed out.† Itís now visible on the screen, ready for use.
1.4.2 createChildren()
The createChildren method is where you create your componentís child components.† For example, if youíre creating a composite component that consists of several text fields, a checkbox, and a button you would create each of these here.
Some examples of Flex composite components are:
- the Button class, which extends UIComponent and has one child, a UITextField for the label text
- ComboBox, which also extends UIComponent and contains a TextInput control to display the text and a Button control for the selection arrow
- the RichTextEditor, which is a very complex composite, contains many other components
When creating children you follow the create/configure/attach pattern.† This is reflected in the child creation sample code below:†
override protected function createChildren():void
{
super.createChildren() ;
if (!messageField) { // donít create if already exists
messageField = new Text() ;
messageField.text = _msgText ; // default value
messageField.explicitWidth=300 ;
messageField.setStyle("paddingTop",10) ;
myComponentInstance.addChild(messageField) ;
}
}
Note the initial check to see if messageField already exists.† This is standard practice when creating component children.† Why might a child already exist?† Because your custom component, which is a subclass of some other component, might itself be subclassed.† In that case the subclass might have already created the messageField child in order to add/modify properties or behavior.
In createChildren you can for the first time safely set properties on child components (because at this point you can be sure they exist).† As mentioned earlier, assigning values to properties of your component's child components through setters requires special processing, since setters can fire at component creation time (in the Configuration step) when the child doesnít yet exist.† ††Weíll cover this special processing in-depth when we look at the commitProperties method.
Finally, be aware that creating your componentís children within createChildren is a general rule.† Child components that arenít required throughout the entire lifecycle of your component ñ i.e., children that are dynamic, added and/or removed during your componentís life ñ or children that depend on data created later in the initialization process should be created within the commitProperties method.† Why?† Because createChildren is executed only once in the life of your component ñ at creation time, or ìbirthî.† The commitProperties method runs at creation time, too, but it also executes during the life of your component.† In fact there are several lifecycle methods that execute in both the Initialization and Update (birth and life) phases.† These methods belong to the Flex framework invalidation/validation pattern, and thatís the next topic weíll cover.
1.4.4 first full invalidation/validation pass
After executing the createChildren method Flex invokes a series of methods based on an invalidation/validation pattern.† This portion of the lifecycle is designed to handle changes to component properties, determine the height and width of your component, and determine where to position it (and its children) on the screen.† Itís a big topic and applies to the Update phase as well as the Initialization phase so itís covered in a separate section.†
The Invalidation/Validation Model†
As with other aspects of the component lifecycle, the invalidation/validation model is used to sequence processes and increase efficiency by deferring work.† Your use of this lifecycle feature will in part depend on the component youíre creating.† If youíre creating a one-off component that has no children and is tightly bound to your application then you might not make use of the lifecycleís validation methods.† In this case efficiency might not be at a premium.† However, if youíre creating a component that will be used often (e.g., a tool for a library shared with other Flex developers) then you should leverage this lifecycle feature.† Understanding this portion of the lifecycle is one of the most important factors in writing efficient components.
Itís worth mentioning that the invalidation/validation model is used by nearly all Flex framework components.† Adobe developers did this because framework components need maximum efficiency.† You can learn a lot by looking at Flex source code and see how they exploit the invalidation/validation model (for example, see the source for the Panel class).† ††
Validation methods
Validation methods are used to:
- set and update your componentís properties
- determine your componentís measurements (height and width)
- perform layout of child components
- execute drawing operations on your component
The validation methods are summarized below.† Itís important to note that these methods execute in the order theyíre listed ñ nearly all property values are known before your component is measured, and its size must be known before its children can be sized and positioned.
- 1. Initialization
- 1.1 construction
- 1.2 configuration
- 1.3 attachment
- 1.4 initialization
- 1.4.1 dispatch preInitialization event
- 1.4.2 createChildren() is called
- 1.4.3 dispatch initialization event
- 1.4.4 invalidation/validation
- 1.4.4.1 invalidation check
- 1.4.4.2 execution of validation methods
- 1.4.4.2.1 commitProperties()
- 1.4.4.2.2 measure()
- 1.4.4.2.3 updateDisplayList()
- 1.4.5 dispatch creationComplete event
- 2. Update
- 3. Destruction
| Lifecycle Method | Purpose |
|---|---|
| commitProperties() | use to assign properties to child components, assign properties that are dependant on other properties, and sometimes to create children |
| measure() | use to calculate your componentís height and width |
| updateDisplayList() | for drawing on your component (e.g., bgColor) and (for composite components) for sizing/positioning children |
Table 2:Validation methods
| |
A fourth validation method, layoutChrome, has been omitted from this primer to keep this lifecycle intro a bit simpler. |
In your custom components youíll make use of validation methods by overriding them to inject your own code into the lifecycleís processing.† For example, when you create a composite component youíll override updateDisplayList, and that override will contain your code for sizing and positioning child components.†
Note that you donít need to override all (or any) of the lifecycleís validation methods in your componentís implementation; you override only those methods that provide the functionality you need.† For example, if you want to create a container component that uses a custom layout (e.g., a reverse VBox that lays out its children from bottom-to-top instead of top-to-bottom) youíd only need to override updateDisplayList.
In the lifecycleís Initialization phase all validation methods execute automatically.† However, in the lifecycleís Update phase these methods are triggered by calling an invalidation method.† You will call these invalidation methods in your own code or they can be (and often are) called by Flex framework code.†
Invalidation methods
You can trigger a validation method by executing its associated invalidation method (see table 3 below). †Executing an invalidation method sets a Flex framework flag that tells Flex you want its associated validation method executed. † During each frame cycle, just prior to the frame's rendering phase, Flex checks these flags in the invalidation pass (step 1.4.4.1).† If a flag has been set then its method is executed in the next validation pass (step 1.4.4.2).†
The component lifecycle invalidation methods are:
| Flag method | Result |
|---|---|
| invalidateProperties() | sets a framework flag that will trigger execution of commitProperties() |
| invalidateSize() | sets a framework flag that will trigger execution of measure() |
| invalidateDisplayList() | sets a framework flag that will trigger execution of updateDisplayList() |
Table 3: Invalidation methods
You might wonder why flags are used as opposed to directly calling the validation methods.† If you did that your setter that might look something like this:
public function set msgText(value:String):void
{
msgText = value ;
commitProperties(); // DONíT DO THIS!
}
This setter would probably give you the result you want - the property value would change, and whatever code youíve put in commitProperties would run. †And run right away.† But in this case immediate execution isnít a good thing.† In fact there are several problems with directly calling validation methods (but weíll consider only two).†
First problem: †with the setter above, if you changed msgTextís value several times in a frame cycle youíd execute commitProps once for each property change.† But wouldnít it be better to have it run only once, only after you have the propertyís final value?†
Second problem: †if you use this logic in 10 different setters and all 10 of these setters fire in a frame cycle then youíd execute commitProperties 10 times.† But wouldnít it be better to run it just once and have it process everything in that single execution?†
This should sound familiar.† Remember our earlier example where we changed a componentís borderColor from blue to yellow to red?† In that example we learned that Flex optimizes its rendering through deferral.† Well, the rationale for the lifecycleís invalidation flags is similar.† In fact the lifecycleís invalidation/validation mechanism is one way Flex integrates into the Flash Playerís deferred rendering model. † Bottom line, the invalidation/validation process is largely about timing and deferral ñ doing things at the right time in the right order and doing them in as few executions as possible.
Of course, as a good programmer you wouldnít write multiple setters like the one above, youíd write more efficient code, maybe using flags to consolidate calls to commitProperties.† But why bother ñ thatís precisely what the Flex framework has provided you with its component lifecycle methods.†
To summarize:† the lifecycle uses invalidation/validation to defer work and increase efficiency.† If you set hundreds of properties during a frameís code execution cycle you can ensure that commitProperties will execute in this frame cycle ñ†and execute only once ñ†through a simple call to invalidateProperties.† ††
So, where should you use invalidation methods?† Calls to invalidation methods are generally made in your setters. †In the next section weíll look at a setter written to exploit the component lifecycle.†
1.4.4.1 †commitProperties()
The purpose of the commitProperties method is to:
- efficiently/safely set property values
- set property values that are dependant on other property values
- create children which are dynamic or which depend on properties (especially data) that isnít available when the createChildren lifecycle method executes
commitProperties: efficiently/safely set values
In addressing the setting of property values letís consider the case of a composite component.† The user of your component will generally set component property values. Often these values will affect your componentís children.† For example, your component might surface a text property whose value it displays in a child (say, a Text component). † If you named this property msgText then the property-setting MXML code might look something like:
<myComps:MyCompositeComponent msgText=ìsome textî/>
But setting this property on a child component presents a timing problem. Remember step 1.2, the Configuration step?† Thatís where property values are processed, and where setters execute (of course, setters can also execute later in the life of your component, during the Update phase).† But the Configuration step canít safely assign property values on your children since they havenít been created yet - you'll be creating them later, in createChildren (step 1.3).† When dealing with properties that will be applied to child components you need to keep in mind timing - if you try to assign the string ìsome textî to a child's text property before that child exists then bad things will happen (i.e., youíll get an RTE on a null object reference). The solution is commitProperties. In commitProperties you can safely make the assignment since the component lifecycle always executes commitProperties after createChildren. †
By convention the assignment of values to child component properties is done as follows:
1. the setter stores the property value in a holding variable
2. in commitProperties that value is committed
Let's look at this in more detail. Hereís some code that shows how setters and commitProperties are used to safely set properties on child components (explanation follows the code):
1. Your component defines a setter for its msgText property and some variables this setter uses:
private var _msgText:String = "default value" ;
private var msgTextChanged:Boolean = false;
public function set msgText(value:String):void
{
if (_msgText != value)
//messageField.text = value;<-DONíT DO THIS!
_msgText = value ;
msgTextChanged = true;
invalidateProperties();
invalidateSize() ;
invalidateDisplayList() ;
}
}
2. In an override of commitProperties you commit the value:
 if (msgTextChanged) {
    msgTextChanged = false;
    messageField.text = _msgText ;
 }
Letís consider what happens in code above.
1.a. To surface the msgText property your component defines a setter.† It also defines a holding variable (in this context called backing store variable, or just a backing variable) and a Boolean to use as a dirty flag.
1.b. The setter, which executes whenever a value is assigned to the property, does the following:
- first checks to see if the new value equals the current value, and if true then does nothing (avoids unnecessary processing)
- stores the new value in the backing store variable.† By convention the backing store uses a name in the format:† underscore + name of the property (so for the msgText property itís _msgText).
- sets a flag to indicate this property value is now ìdirtyî and needs to be processed (more on this below)
- calls invalidation flags to trigger validation methods
2. In commitProperties:
- the dirty flag is reset to false
- the backing store value is assigned to the child componentís text property
Itís important to note the dirty flag reset in step 2.† Without that youíll have introduced inefficiency into your program, since without this flag reset the msgText processing block would be triggered each time commitProperties executes.
Also, in the above code all three invalidation methods are called.† InvalidateProperties is called to ensure that commitProperties executes, since thatís where you actually commit the †property value (hence the name).† InvalidateSize is called because changing the string may change the size (if no explicit size was given).† And invalidateDisplayList is called because a changed size may affect the layout of your componentís children.† Of course, you wonít always have to call all three invalidation methods ñ for example, if the change is only to the alignment within a text field you donít need to measure or layout.
commitProperties: set values which are dependant on other values
In commitProperties you also assign values that are dependant on other properties.
About two years ago Peter Ent wrote a series of articles on creating custom classes, and they include such a clear and concise explanation of this I'll just quote him here:
CommitProperties allows you ìto set values which depend on the values of properties already set. For example, suppose you have three properties: quantity, price, and total. Where total = quantity*price. When do you set total? You can't set in from the price setter because you don't know if quantity has been set. You can't set it from quantity's setter because price might not be set. That's where commitProperties comes it. When commitProperties is called you know that all of your setter functions have been run. Now you can make the calculation for total safely.î
commitProperties: create children
You can also use commitProperties to create children that are dynamic ñ i.e., arenít needed through the entire life of your component and so are added/removed dynamically.†† CreateChildren isnít the place to do this since it executes only once, during† the lifecycle Initialization phase.† However, commitProperties executes during both the Initialization and Updates phases, which makes it a good place for creating dynamic children.
You can also use commitProperties to create children that depend on properties that arenít available when the createChildren method executes.† An example of this might be a DataGrid whose data isnít yet generated or retrieved when createChildren executes.
Next up is a relatively simple validation method (and one you might not often use), the measure method.
1.4.4.2 †measure()
The purpose of the measure method is to determine the preferred size of your component.† This method assigns your componentís values for measuredHeight, measuredWidth, measuredMinHeight, and measuredMinWidth.
Itís important to note that the sizes you set in measure arenít necessarily used in the final layout.† They are your request to the framework, the sizes youíd prefer.† However, the final height and width may be adjusted by Flex depending on available space and other factors.
An override of measure can be as simple as:
 override protected function measure():void {
	measuredWidth=400;
	measuredHeight=75;
	measuredMinWidth=50;
	measuredMinHeight=22;
 }
Alternatively, your measure override might perform calculations to determine its sizes (the example code below†is taken from chapter 9 of ìCreating and Extending flex 3 Componentsî).
 // Default size is the size of the text plus a 10 pixel margin
  override protected function measure():void {
	super.measure();
	// Calculate the default size of the control based on the
	// contents of the TextArea.text property.
	var lineMetrics:TextLineMetrics = measureText(text);
	// Add a 10 pixel border area around the text.
	measuredWidth = measuredMinWidth = lineMetrics.width + 10;
        measuredHeight = measuredMinHeight = lineMetrics.height + 10;
 }
In overriding measure you can omit a call to super.measure() if you set all four height and width values.† However, itís a good practice to always call super on a method.† If you do call super then do it at the start of the method, else the super call will overwrite the values youíve set.
A warning is in order here:† be careful what you put in measure since you canít rely on its execution even if you call invalidateSize.† Why? Because a component's height and width can be determined by explicit values as well as measured values.† For example there is a width-related property explicitWidth as well as †percentWidth and measuredWidth.† When an explicit value is provided then measure wonít run because thereís no measuring to do, Flex already knows the height/width.† As a result, donít put anything critical in measure since you canít rely on its execution.
1.4.4.3 †updateDisplayList()
The updateDisplayList is for drawing, and for child sizing and placement.† This method is passed two parameters, unscaledHeight and unscaledWidth.† Hereís the method signature:
updateDisplayList(unscaledWidth:Number,unscaledHeight:Number):void
These two values are the sizes that Flex has determined for your component. They come from an explicit height/width †OR †the values determined in the measure method †OR theyíre determined through measuring done by the component's parent.† While Flex has determined these values you can override them here, though itís better to do this sort of thing in measure.† However, in updateDisplayList you have total control of layout, and you can do things that Flex might not.
updateDisplayList: drawing on the component
Sometimes youíll use an override of updateDisplayList for drawing on your component.† For example, if your container doesnít support a backgroundColor you can draw it programmatically using the Graphics class, something like:
 override protected function updateDisplayList(unscaledWidth:Number,
	                                 unscaledHeight:Number):void
 {
     super.updateDisplayList(unscaledWidth,unscaledHeight);
     var g:Graphics = graphics;
     g.clear();
     g.beginFill(0xFFc0cb);
     g.drawRect(0, 0, unscaledWidth, unscaledHeight);
     g.endFill();
 }
As you know by now, these graphic operations arenít rendered to the screen immediately, that wonít happen until the render phase.
updateDisplayList: sizing and laying out children
For composite components, updateDisplayList is where you set the size and position of your child components.† This generally involves calculations using unscaledWidth and unscaledHeight as your bounds, and Adobe recommends you do the following:
- to get the size of a child UIComponent use getExplicitOrMeasuredWidth()
- to set the size of a child UIComponent use setActualSize()
- to get the position of a child UIComponent use x and y
- to set the position of a child UIComponent use move()
The getExplicitOrMeasuredWidth is a convenience method that returns a number which is explicitHeight if defined or measuredHeight if not.
To set the location of children you should use the move method rather than setting values on the childís x and y properties. †The difference between directly assigning values to the childís x and y properties and using the move method is that move changes the location of the component and then dispatches its move event immediately, whereas setting the x and y properties changes the location of the component and dispatches the event on the next screen refresh.† For details see Adobe's "Creating and Extending Adobe Flex 3 Components" Chapter 9.† A similar efficiency gain is true for positioning: to set your child component sizes you should use setActualSize rather than their width and height properties.
Below is some code that illustrates doing layout operations within an override of updateDisplayList.†
 // note that this component extends TitleWindow
 override protected function updateDisplayList(
      unscaledWidth:Number,
      unscaledHeight:Number):void
 {
    super.updateDisplayList(unscaledWidth,unscaledHeight);

    // --------------------------------------------
    // position the children within the titlewindow
    // --------------------------------------------
    // Calculate TitleWindow's addressable space for positioning
	// its child UICs, omitting headerHeight, borders, etc.
    var vm:EdgeMetrics = viewMetrics ;
    var usableWidth:Number  = unscaledWidth-vm.left-vm.right  ;
    var usableHeight:Number = unscaledHeight-vm.top-vm.bottom ;

    // VERTICAL_GAP is a constant defined in this component
    messageField.move((usableWidth-messageField.width)/2, VERTICAL_GAP) ;

    // center checkbox horizontally
    suppressNagCheckBox.move(
          (usableWidth-suppressNagCheckBox.width)/2 ,
          messageField.y+messageField.height+VERTICAL_GAP) ;

    // here don't add VertGap constant, in fact use -5
    // to tightly associate CBox with its warning text
    checkBoxWarningText.move(
           (usableWidth-checkBoxWarningText.width)/2,
           suppressNagCheckBox.y+suppressNagCheckBox.height-5);

    // closeButton X value varies if CBox is used
    if (showCheckBox) {
          closeButton.move(
              (usableWidth-closeButton.width)/2,
              checkBoxWarningText.y+checkBoxWarningText.height+VERTICAL_GAP);
    }
    else {
         // in this case use two vGaps just for aesthetics
         closeButton.move(
              (usableWidth-closeButton.width)/2,
               messageField.y+messageField.height+VERTICAL_GAP+VERTICAL_GAP);
    }
 }
The validation/validation processing described above applies not only to component initialization, but also to the ìlifeî of your component ñ that is, your ongoing use of the component in your app, where it responds to user events, Flex events, and your custom generated events.†† Weíll cover this in the next section, the Component Lifecycle Phase 2 ñ Update.
Lifecycle Phase 2 - Update
The Update Phase represents the ongoing use of your component within your application.† Hereís a recap of the lifecycle primary phases:
- Initialization
- Update
- Destruction
In the Update phase your component (your application, actually) is responding to events, either Flex framework events or your custom events.† In this phase everything is event-driven ñ even user interactions like a mouse click only execute code through the firing of an event.†† So, in this phase your application does its work through event handlers and the invalidation/validation model.
When your componentís event handlers fire you can use the validation/invalidation methods just as you did in the initialization phase ñ† to process property value changes, to add (and now potentially remove) children, to draw on the component, etc.†
Hopefully by now you can see how youíd use the lifecycle to do these tasks:
- for a property change your setter would store the value in a backing store variable and call invalidateProperties to ensure that commitProperties executes in this frame.† In commitProperties youíll have code that commits the value (and resets your dirty flag). You don't have to do this for all properties, but for child properties and properties that depend on other properties you should do this to avoid timing problems.
- to add or remove children youíd again call invalidateProperties because commitProperties is where dynamic children are handled.† Youíd probably also call invalidateDisplayList since updateDisplayList is where youíd adjust the layout of your child components.
- to draw on the component youíd use an override of updateDisplayList, ensuring it runs by calling invalidateDisplayList in your event handler. Of course, you might just put your drawing routine in a method and call it whenever it's needed. But if your drawing routine might get called redundantly in a frame cycle then putting it in updateDisplayList can ensure that 1) it runs only one in this frame cycle, and 2) it will use your component's final (for this frame) property values.
Before covering the Destruction Phase letís revisit the Flash Player AVM and frame processing, since this is especially relevant to efficiency in the Update phase.
Frames and the ìElastic Racetrackî†
Since a primary focus of the Flex component lifecycle (and this article) is efficiency itís worth taking a moment to go a little deeper into Flash player and Flex framework processing.† This may help you understand why writing efficient code is important not just for performance (faster response) but also for avoiding rendering problems (jerky screen refreshes).
Earlier we looked at how the Flash player executes frames, cycling between running code and rendering the results to the screen.† Letís decompose this a bit more, taking into account the invalidation/validation processing.† Hereís a little more detail into what happens in the code execution phase:
- the framework processes events (e.g., it fires an enterFrame event)
- your own code executes (e.g., an event handler executes on enterFrame, perhaps setting property values which call invalidation methods)
- just prior to the render phase Flex responds to invalidation flags by executing validation methods as required
- the code phase ends and the render phase begins
Ted Patrick, one of Adobeís Flex architects, has termed this code execution and rendering cycle the ìelastic racetrackî. †Why elastic?† Because, while the Flash player will always try to execute at the SWFís framerate, it may need to adjust things if you overload it with work.† Overloading happens when your application asks the Flash Player to do more processing than can ìfitî in the current frame (remember that each frame is sized for the current frame rate).† When a frame is overloaded the Flash player will †ìstretchî it ñ that is, increase the time it is allotted ñ† in order to fit in all the work to be done (because Flex will always do the work you tell it to do, itís lossless).†
The above comes with a potential side effect ñ when frame processing is stretched youíll begin to see latency as the frame rate degrades.† ††
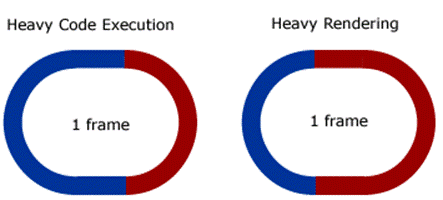
Figure 2: Stretching of frames through overloading
So, how can you overload and consequently stretch a frame?† In the code phase you could do this by processing a lot of data or by performing a long series of complex calculations.† In the render phase you could do it by loading the screen with many nested and complex objects whose visual properties are constantly changing, or you might have told Flex to do a lot of computationally intensive drawing operations. †
On the subject of overloading the rendering phase, itís worth repeating something said earlier ñ always keep in mind that code which can execute in a millisecond can sometimes take much longer to actually render to the screen.†
While this topic applies to the components you create, it also applies generally to the entire application code, both ActionScript and MXML.† What are some of the things you should keep in mind to avoid overloading a frameís processing?† Well, mostly weíre talking about general code efficiencies.† There are plenty of blogs posts and papers on this topic so Iíll mention just a few:
- be wary of nesting containers unnecessarily or too deeply.† When Flex processes the display list tree it makes multiple passes for measuring and layout, and if it needs to process a lot of tree nodes this can get expensive in terms of time/processing/memory
- changing a componentís styles after itís on the stage can be very expensive in terms of processing.† Flex has to deal with style value inheritance, so it must both determine the correct values (processing the style tree for style values that might need to be inherited) and then apply the visual changes (render ops).†
- if you use dirty flags donít forget to reset them.† Missing a single flag reset wonít kill you, but add enough small inefficiencies and they can add up to a stretching of the frameís code exec phase
- do as little work as possible in the constructor and configuration steps, and in your setters; try to defer work to the validation step
Note that this primer's consideration of AVM processing is a simplification to support explanation of the component lifecycle. For example, the circular diagram showing the frame's code and render phases is only a high-level view - in fact the code phase is itself subdivided into many time slices, and the render portion of an "unstretched" frame cycle is usually much smaller then the code execution portion). For more information on this topic see the resources listed at the end of this article (especially Sean Christmann's analysis of AVM2).
Lifecycle Phase 3 - Destruction
The Destruction phase is the ìdeathî of your component.† The three primary phases are recapped below, with a decomposition of the Destruction phase.
- 1. Initialization
- 2. Update
- 3. Destruction
- 3.1 detachment
- 3.2 garbage collection
3.1 Detachment
Detachment is the removal of a component from the display List.† Detachment is required before a component can be destroyed.† However, note that sometimes youíll detach a component without destroying it.† In fact this is good practice if youíll need that component again later, perhaps to add it to a different parent ñ adding it back to the display list is cheaper than creating a new one.†
3.2 Garbage Collection
Garbage collection is the framework process for reclaiming memory.† For a componentís memory to be eligible for garbage collection it must have been removed from the display list. There must also be no active references to the component; if there is an active reference to your component then the framework wonít GC it.†† Components that are not longer needed and have been removed from the display list but still have active references are one source of memory leaks in your application.† One way to ensure the component is eligible for garbage collection is to set any active reference to null.†
Note that an ìactive referenceî to the component includes event listeners ñ even if youíve set references to your component are null, if there are event listeners on that component then it canít be GCíd.† One way to handle this is to execute a removeEventListener for each addEventListener on the component.† However, you can also use the addEventListener parameter useWeakReference when defining event listeners.†† Listeners that have been set with useWeakReference=true wonít inhibit garbage collection.†
Note that your componentís children will be garbage collected automatically if their parent becomes available for GC (unless youíve violated OOP and let code external to your component obtain a reference to that child, and those external references still point to the child).
Keep in mind that garbage collection doesnít run constantly so your componentís memory generally likely wonít be reclaimed immediately.† Garbage collection is a complex and somewhat arcane topic, worthy of a paper in itself.† Especially good are †Grant Skinnerís posts on the topic.
Conclusion
The Flex component lifecycle is a set of processes for creating, managing and destroying components. ††The lifecycle ensures that these processes execute in the proper order and with a consistent set of triggers.† These processes are surfaced to you as protected methods.† You can override these methods to inject your own code into the lifecycle process. Done correctly this can allow you to create more advanced and efficient components.† †
Keep in mind that you don't have to use the lifecycle for everything - you can have an event handler that instantiates your component and sets properties and adjusts the child layout in a single block of code and generally you won't run into timing problems. But often this isn't the most efficient way of doing things. As noted above, what you do depends on your use case - tightly-bound one-off components require less analysis, design and coding than components that you'll be using many times in many different situations.
So, what about Flex 4?† Well, Spark is build on top of Halo, and pretty much everything covered above still applies.† However, in Flex 4 most of the lifecycle steps covered above have new subprocesses to handle the new skinning architecture.† So, you still have the createChildren lifecycle method, but in Flex 4 createChildren may itself call new lifecycle methods like validateSkinState.† The bottom line: learning the Flex 3 lifecycle isnít wasted time, and in fact gives you a head start on understanding the internals of Flex 4.
Things we havenít covered
This article was focused on the Flex component lifecycle and didnít cover related topics regarding custom Flex components (what about creating and dispatching custom events! skins! metadata tags!).† A book could be written about all of this, and in fact one was, the Adobe document ìCreating and Extending Adobe Flex 3 Componentsî ñ see the resources section below for more information on this document.
Recommended Flex Component Lifecycle Resources
This primer may be useful as a starting point, but if youíre looking for a ìdeep diveî into the topics covered here then you should check out the resources listed below.
Adobe documentation
Hereís a livedocs entry point on the topic of the component lifecycle:
∑ http://livedocs.adobe.com/flex/3/html/help.html?content=ascomponents%5Fadvanced%5F1.html#210754
While Livedocs is great, sometimes itís easier to work through a complex topic when the info is in book form.† Adobe has a 200+ page document called ìCreating and Extending Adobe Flex 3 Componentsî (from which the Livedocs content is taken).† This pdf document can be downloaded from Adobeís Flex documentation page .† Chapter 9 covers the component lifecycle in depth.
And, as always, make use of the classdoc.† Want info on the validation methods?† See the Protected Methods section of UIComponentís classdoc entry.
Adobe TV videos
Adobe TV is generally excellent, and here are a few especially good 360|Flex presentations on the lifecycle and component creation:
- Creating New Components in Flex 3 by Deepa Subramaniam
- Diving Deep with the Flex Component Lifecycle
- Creating Reusable Components by Ben Clinkinbeard
White papers and blog posts
- James Polanco and Aaron Pedersenís of developmentarc have written a in-depth white paper: ìUnderstanding the Flex 3 Component and Framework Lifecycleî
- In 2007 Adobe developer Peter Ent did a 5-part series titled "Component Class" but they no longer seem to be online. If I find them I'll update this page.
- IBM employee Sandeep Malik has written a very useful analysis of the lifecycle, "Create a Flex Component"
- Here is Ted Patrickís original post on FP and AVM frame processing where he coined the term ìelastic racetrackî
- Sean Christmann's analysis of AVM2ís implementation AVM ìmarshallingî
- Sean Christmann also did a Max 2008 presentation which partly covers the FP and AVM.